


Introduction to AWS Command Line Interface
Introduction
The AWS Command Line Interface (AWS CLI) is an open source tool that enables you to interact with AWS services using commands in your command-line shell. With minimal configuration, you can start using functionality equivalent to that provided by the browser-based AWS Management Console from the command prompt in your favorite terminal program.
Installation
You can install AWS CLI using the following command:
sudo pip3 install awscli --upgrade --user
Verify that the AWS CLI installed correctly by running aws --version.

Creating an Administrator IAM User and Group
The AWS Access Key ID and AWS Secret Access Key are your AWS credentials. They are associated with an AWS Identity and Access Management (IAM) user or role that determines what permissions you have.
To create an administrator user for yourself and add the user to an administrators group:
-
Sign in as the AWS account root user to the IAM console at https://console.aws.amazon.com/iam/
-
In the navigation pane, choose Users and then choose Add user.

-
For User name, type Administrator.
-
Select the check box next to AWS Management Console access, select Custom password, and then type your new password in the text box. You can optionally clear the check box next to User must create a new password at next sign-in to allow the new user to reset their password after they sign in.
-
Choose Next: Permissions. On the Set permissions page, choose Add user to group.
-
Choose Create group. In the Create group dialog box, for Group name type Administrators.
-
Choose Filter policies, and then choose AWS managed - job function to filter the table contents.
-
In the policy list, select the check box for AdministratorAccess. Then choose Create group.
-
Back in the list of groups, select the check box for your new group. Choose Next: Tags.
-
Choose Next: Review to see the list of group memberships to be added to the new user. When you are ready to proceed, choose Create user.
You can use this same process to create more groups and users and to give your users access to your AWS account resources.
Create access keys for your IAM user
-
Open the IAM console at https://console.aws.amazon.com/iam/
-
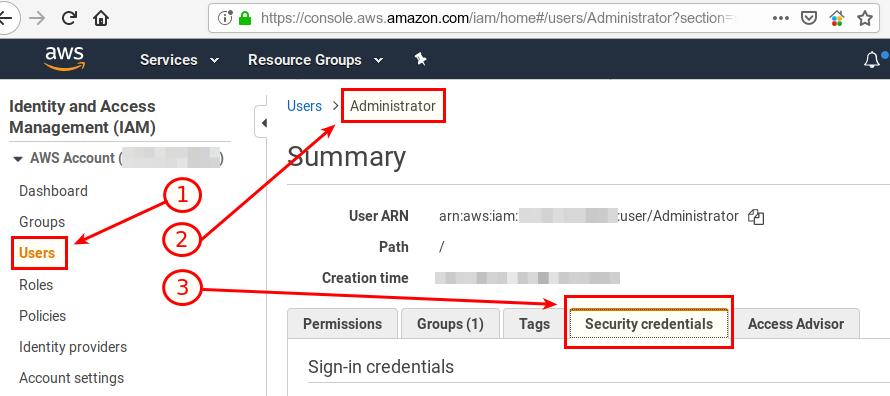
In the navigation pane, choose Users. Click the name of the user (Administrator) whose access keys you want to create, and then choose the Security credentials tab.
-
In the Access keys section, choose Create access key.
- To view the new access key pair, choose Show. You will not have access to the secret access key again after this dialog box closes. Your credentials will look something like this:
- Access key ID: AKIAIOSFODNN7EXAMPLE
- Secret access key: wJalrXUtnFEMI/K7MDENG/bPxRfiCYEXAMPLEKEY
-
To download the key pair, choose Download .csv file. Store the keys in a secure location.
- After you download the .csv file, choose Close. When you create an access key, the key pair is active by default, and you can use the pair right away.
Configuring the AWS CLI
Go back to your terminal, and type aws configure.
Use the Access Key ID and Secret Access Key you downloaded in the above steps. Set Default region to ap-south-1 (Mumbai) and Default output format to json.

Verify if your AWS CLI is properly configured by running the following command in the terminal for fetching your Administrator user’s details.
aws iam get-user
If you’ve any EC2 instances or S3 buckets setup in your account, you can list them using the following commands.
aws ec2 describe-instances
aws s3 ls


Leave a comment